*This guide is currently a simplified beginner-friendly guide for people trying to get into arbitrations
It is created for and by the Warframe Arbitrations Discord community.
You are very welcome to join us, get notified about the current Arbitration, ask questions, discuss strategies, or find a group to run with.
Summary
Basic Strategy
The goal of Arbitrations is to kill enemies as quickly as you can after they spawn, as more kills per minute will equal more Vitus Essence. Arbitration Drones (which drop vitus essence) will spawn up to a maximum of 5 alive on the map at once, so fast kills = more loot and that’s the gist of it. You’ll be running a lot of Power strength + Ability duration and applying a lot of buffs to yourself and your team so even in very long runs you’ll still be killing every enemy with one shot. Your team will set up on one point of the map from where you can see all spawns and you’ll shoot at enemy spawn points from that point of the map, everyone will stay at this point of the map and only leave to go pick up loot between rounds after which you will come back to this point of the map to refresh all your buffs.
This guide contains some minimum requirement builds and min-maxed builds for the meta warframes.
The 4 main meta frames for Arbitrations are:
- Saryn (The main damage dealer) Advanced
- Mirage (Buffer + secondary damage dealer) Advanced
- Chroma (Another buffer + secondary damage dealer) Beginner friendly
- Wisp (A support buffer frame who will also run a support weapon that buffs your team) Beginner friendly
To get more out of your Arbi’s you should run with a resource booster and have a companion with Resourceful Retriever, get a dropchance blessing before the run and have atleast 1 player with a dropchance booster in your squad.
Don’t press Tab during Arbi to view the Scoreboard since this can cause Hostmigrations
Focus schools
You’ll either Run Madurai or Zenurik based on what you have. The following will help you decide which focus school to run.
Madurai
Best tree to run if you have primed sure footed and aren’t worried about getting staggered maxing out the “Sling Strength” node will give you 40% power strength for 20 seconds when you dash twice in operator mode which is great if you’re doing super long runs or if your power strength mods aren’t maxed out yet.
(Mandatory for Wisp)
Zenurik
If you’ve already invested into Zenurik for general gameplay and have Primed sure footed then “Wellspring” node will give your team energy regen which can be nice and “Hardened wellspring” node will give your entire team 20% power strength, very nice if you haven’t invested into madurai and have PSF already (One player should run this. It should be either Saryn or Mirage)
Frames
These build recommended here will work perfectly fine for 80-100 waves in defense, anything above that might be a bit risky.
If you are just getting into Meta Arbitrations it is recommended to start out with either Wisp or Chroma since they have the lowest skill requirement.
Saryn and Mirage should only be played by more experienced players since almost everything relies on them performing well.
Saryn
Primary DPS, huge buff for teammates and herself.
Specters are not optional
Strategy
Throw down an Nidus Specter where your team will camp and press x on it to make it sit still
Wait for Nidus Link
Cast Toxic Lash
Cast Energized Munitions
Kill stuff
Subsumes
Subsume on your 4th ability
- Energized Munitions
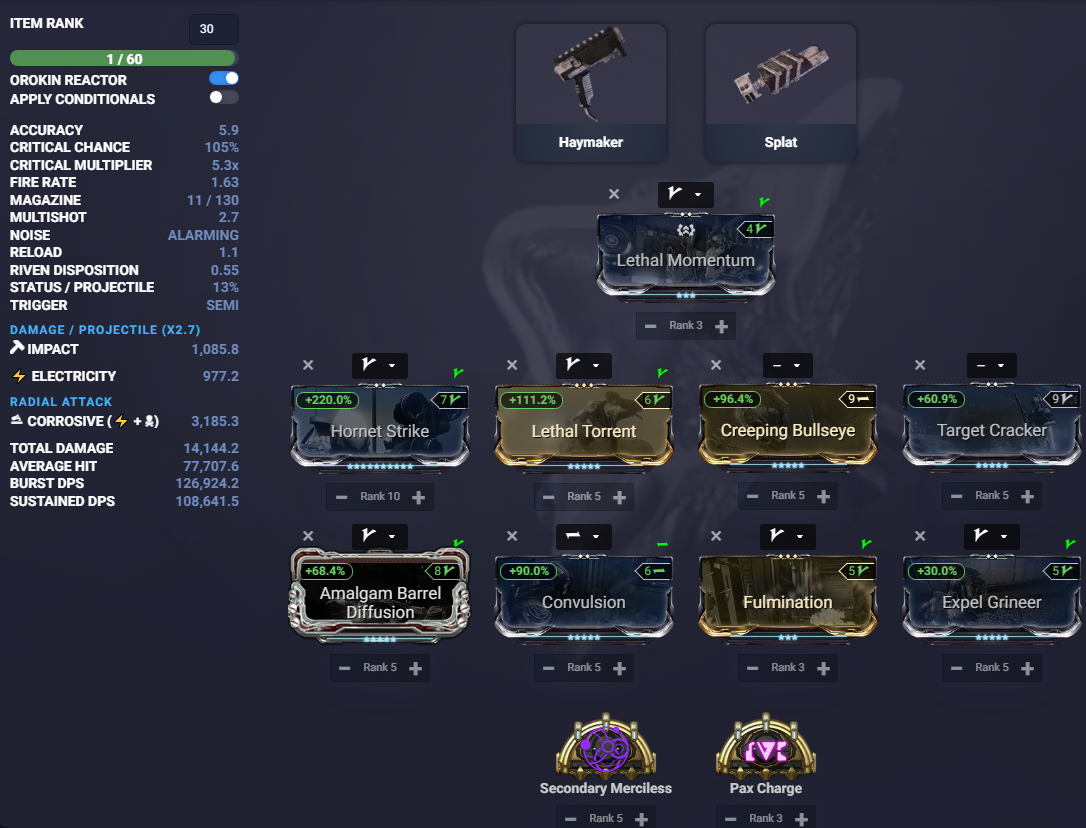
Energized Munitions helps with the constant ammo required to quickly spam your Ogris at the spawns.
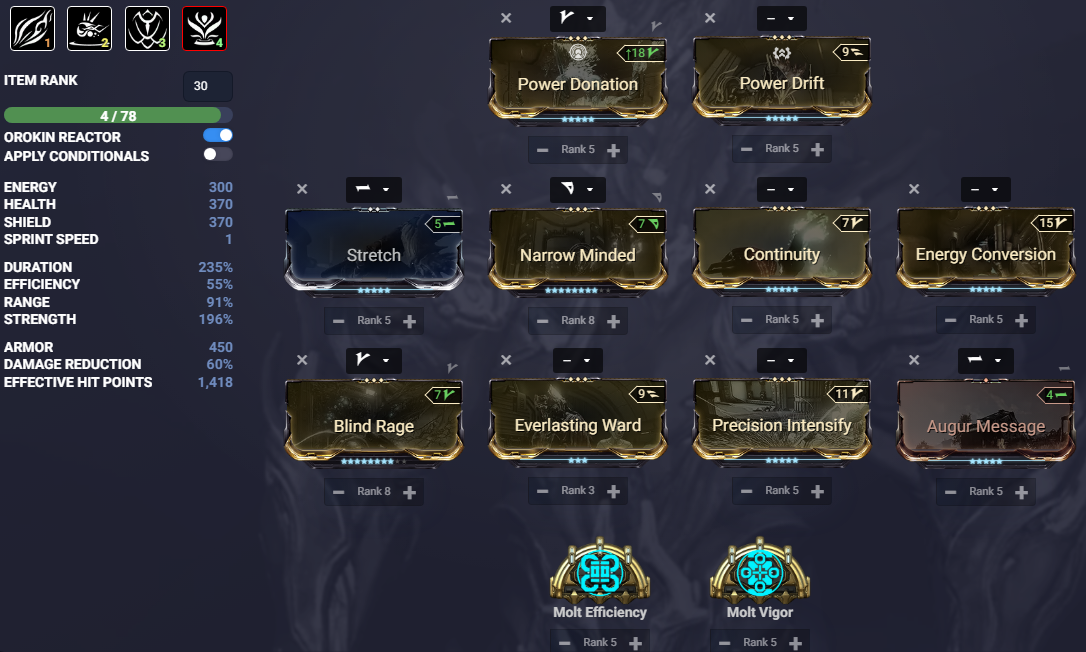
Basic Build
Run Arcane Bellicose instead of Molt Augmented in the screenshot

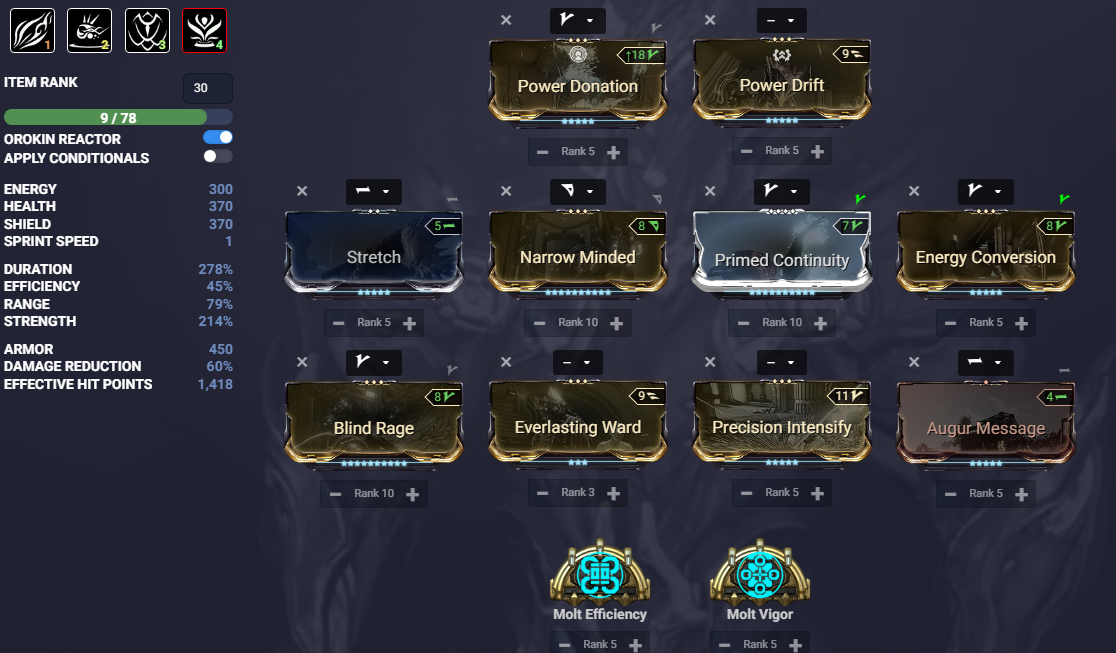
Min-Maxed Build
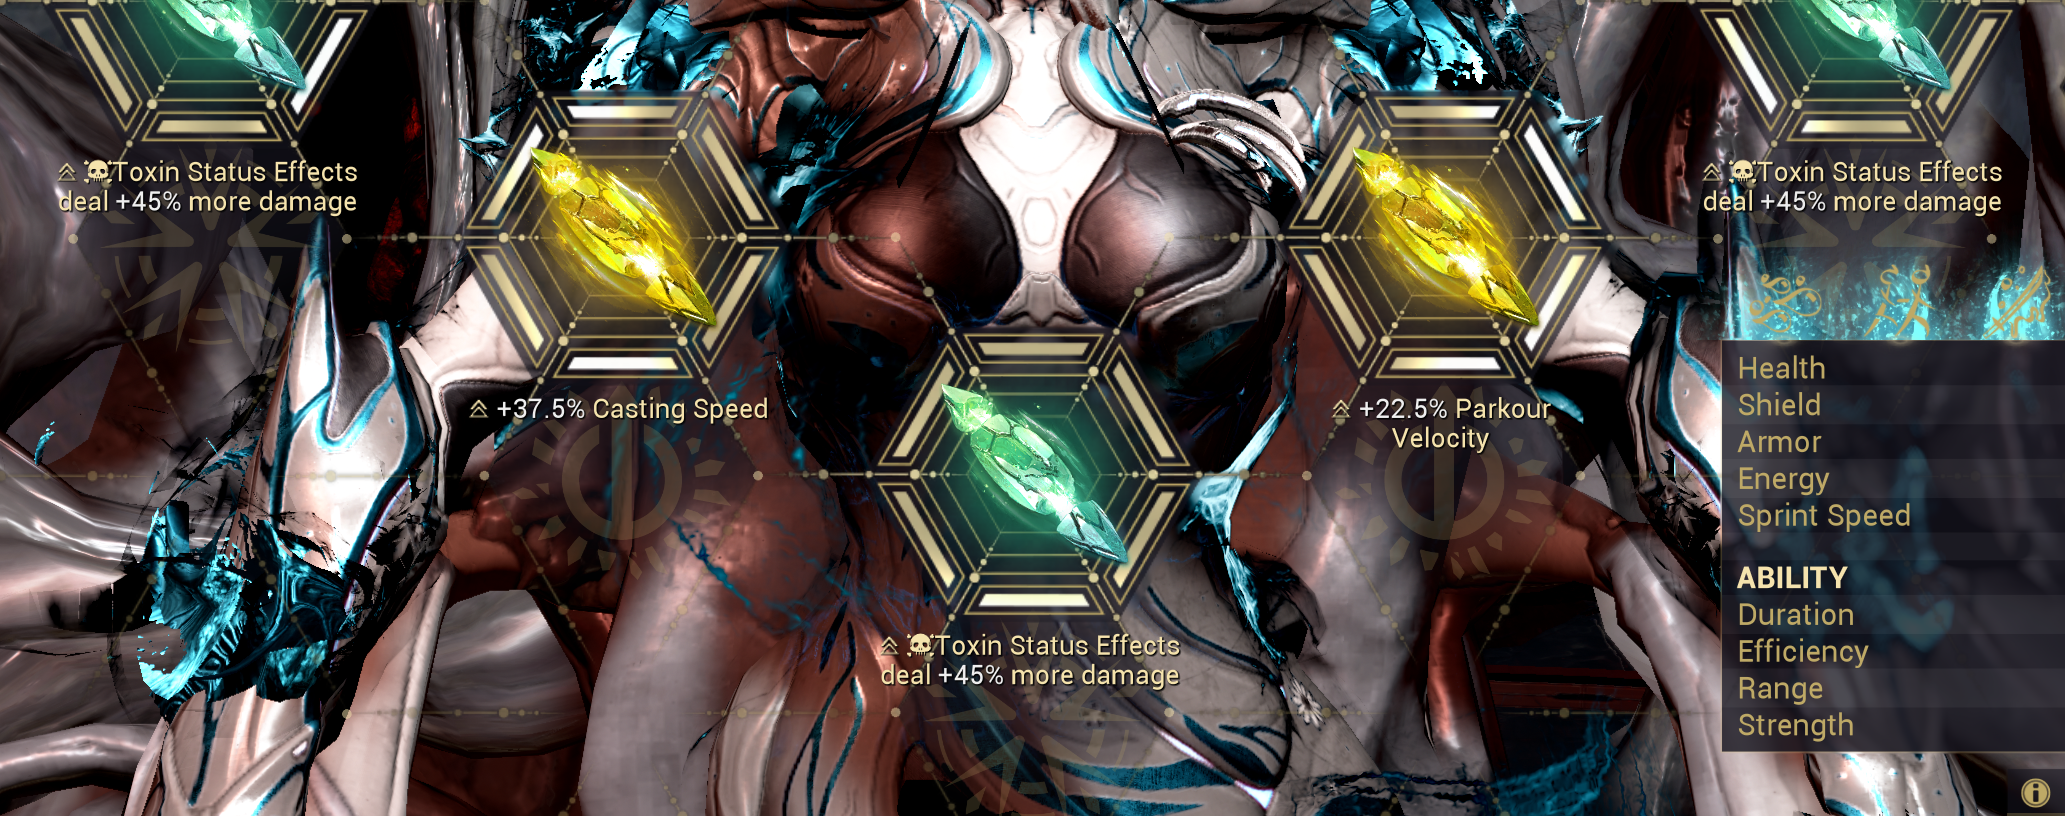
Archon Shards
3x Toxin Damage
2x Parkour Velocity (Faster looting)
Advanced Information
Some people like to run Contagion Cloud, to use its damage numbers to spot enemy spawns faster. Whether or not this is worth running is still under investigation.
Mirage
Strong buff frame with 3 copies that use your Ogris.
Specters are not optional
Strategy
Throw down a Nidus specter and wait for him to tether to you
Put down hardened wellspring from Zenurik
Cast 3rd ability
Cast 1st ability
Cast 4th ability
Kill stuff
Subsumes
Subsume on your 4th ability
- Energized Munitions
Energized Munitions helps with the constant ammo required to quickly spam your Ogris at the spawns.
Basic Build
Run Arcane Bellicose instead of Molt Augmented in the screenshot
Min-Maxed Build
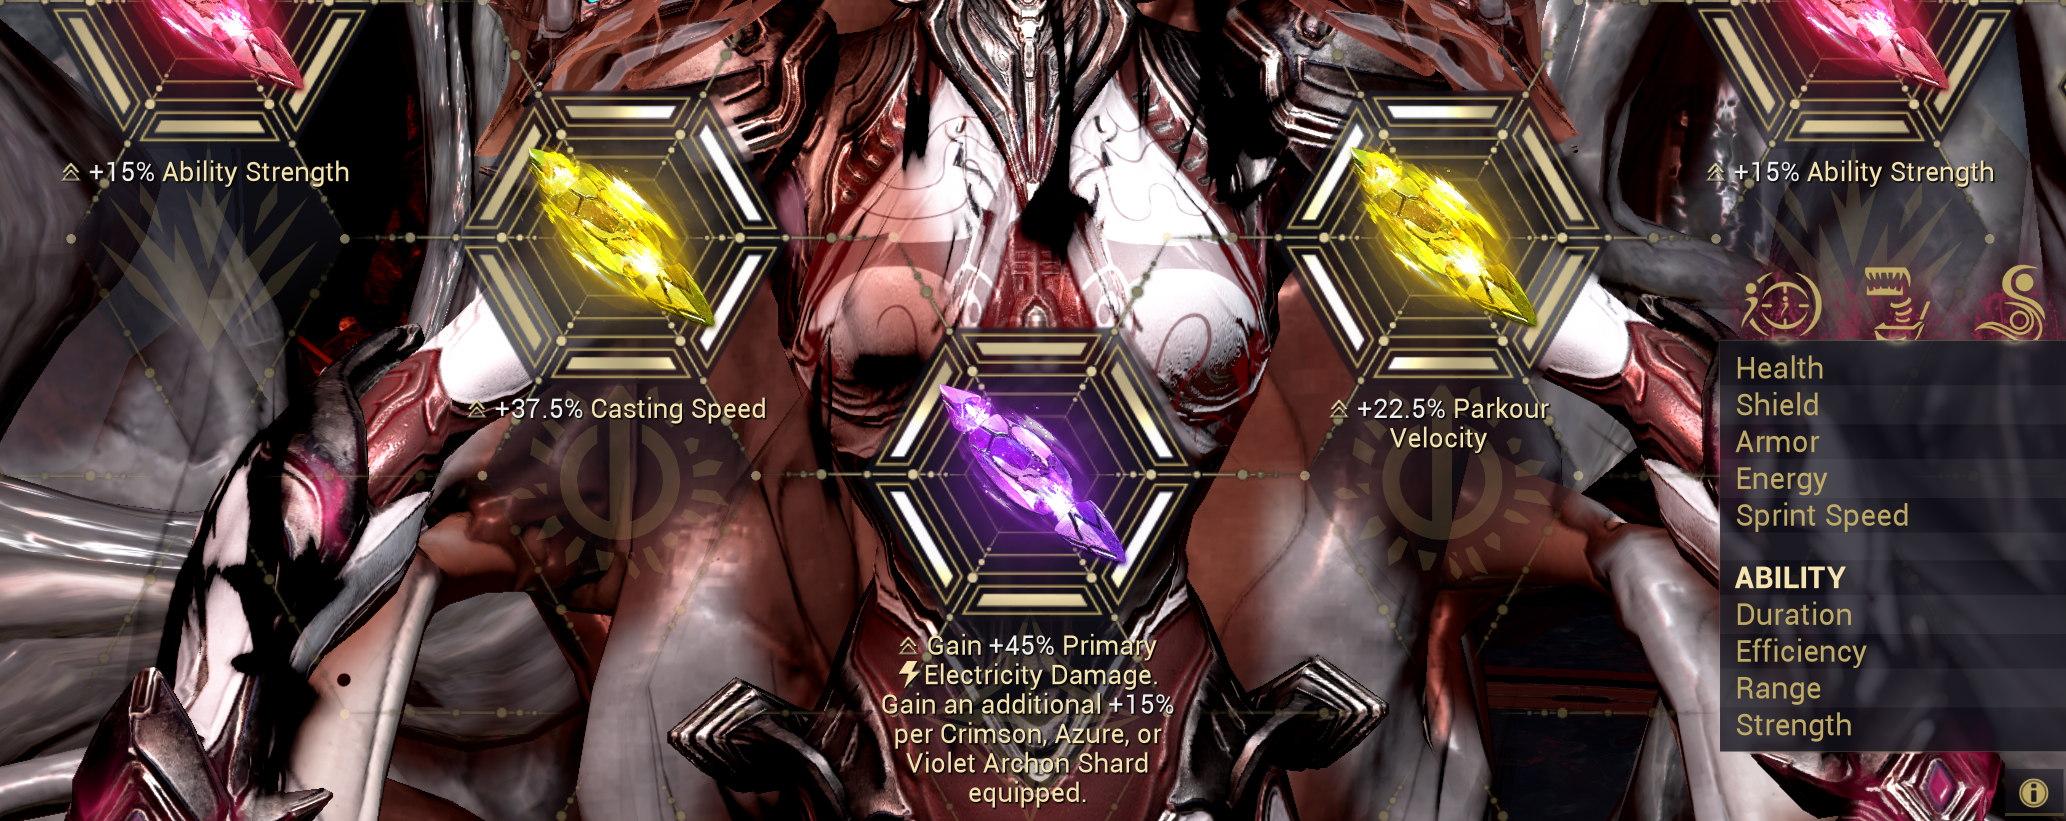
Archon Shards
2x Strength
1x Cast Speed (less downtime due to casttime)
1x Parkour Velocity (Faster looting)
1x Electricity Damage
Chroma
Support Frame, buffs team can Ogris or Afentis if Wisp doesn’t have it, but Ogris is more common
Specters are not optional
Strategy
On Defense you can run either Vazarin or Madurai
On Interception you run Madurai
Madurai for more ability strength and Vazarin to bodyguard the Defense Operator in the later waves of the game
Make sure to use toxin ward for the reload speed and damage boost
Throw down a Nidus Specter and wait for him to tether to you
Double Dash with operator if you’re running Madurai
Get energy orb
Cast 4
DD with Operator
Get energy orb
Cast 3
DD with Operator
Get energy orb
Cast 2
Subsume
Subsume Dispensery on your 4th ability
Basic Build
Run Arcane Bellicose instead of Molt Vigor in the screenshot
Min-Maxed Build
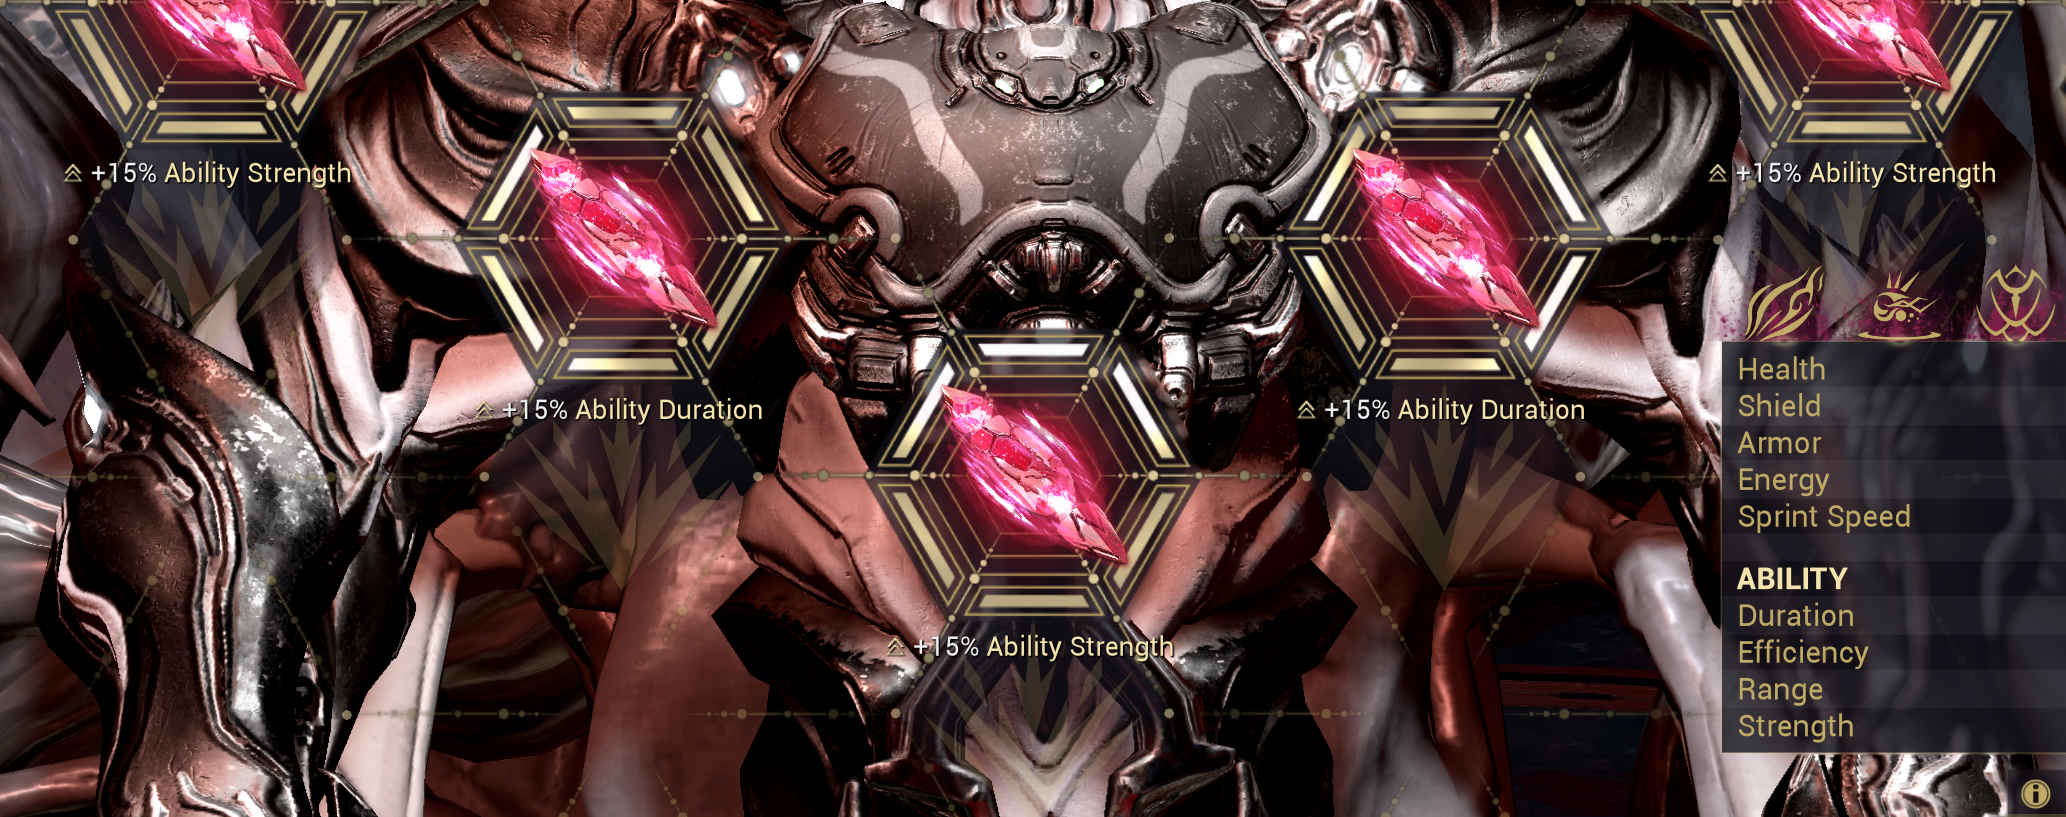
Archon Shards
3x Strength
2x Duration
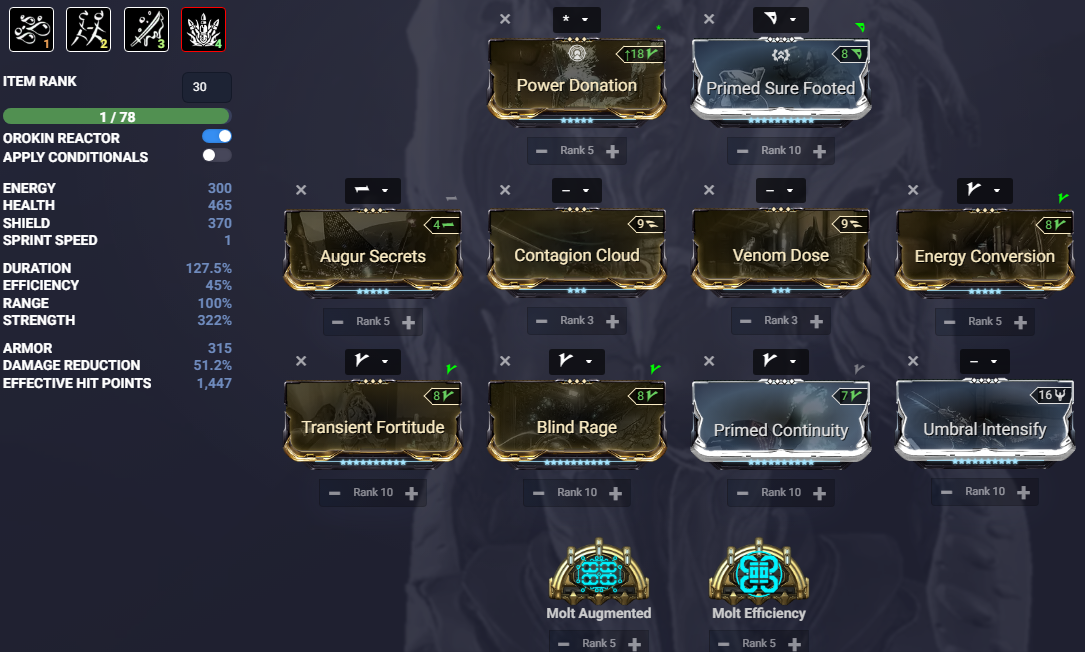
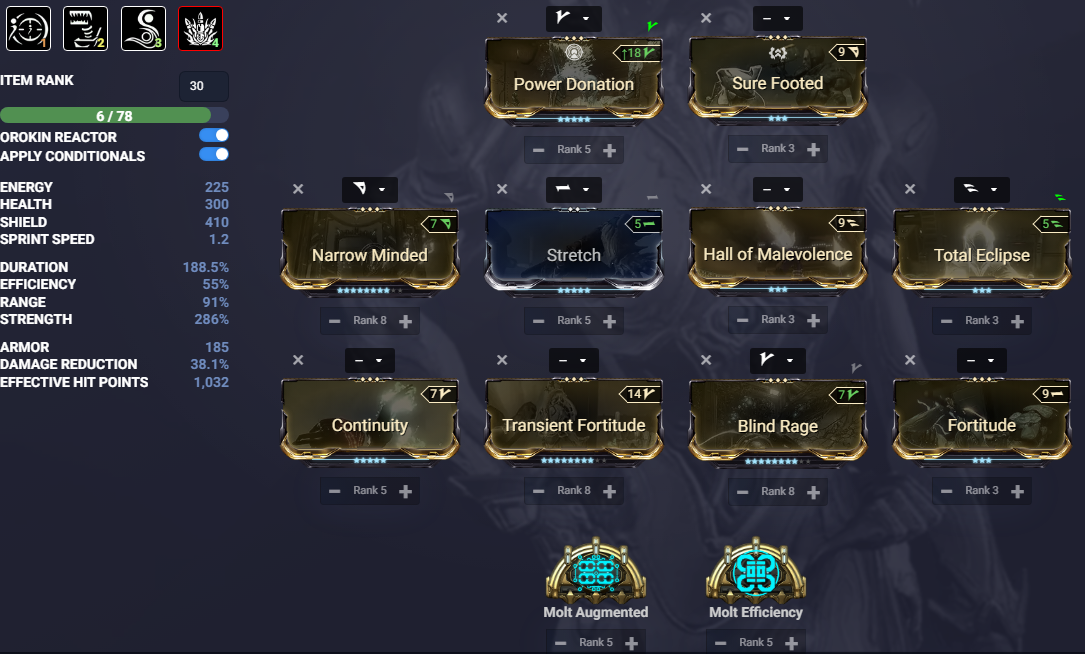
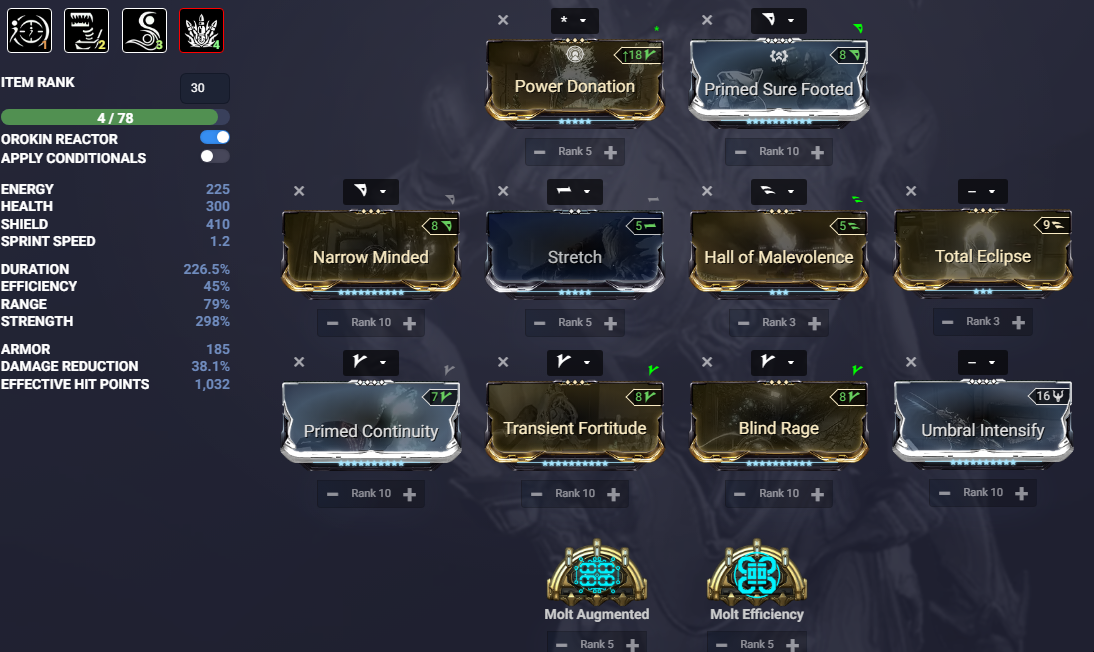
Wisp
Support Frame, buffs team
Specters are not optional
Strategy
Mote setup:
DD with operator for Madurai Sling strength
Place your Nidus Specter and wait for it to tether you
Use an operator ability to trigger Molt Vigor
Get energy orb
Put down a health mote
Get energy orb
DD with operator for Madurai Sling strength
Use an operator ability to trigger Molt Vigor
Put down another health mote for Arcane Bellicose
Get energy orb
DD with operator for Madurai Sling strength
Use an operator ability to trigger Molt Vigor
Put down another haste mote
After Mote Setup repeat this:
DD with operator for Madurai Sling strength
Use an operator ability to trigger Molt Vigor
Get energy orb
Cast Roar
Throw down Afentis, then run to enemy spawns and clear them out on smaller maps with sporelancer
When you reach max stacks on molt augmented, make sure to reset your motes so they benefit off the additional 60% power strength
Nidus Specter is key to increasing your Ability Strength to the high levels desired for Arbitrations
Subsumes
Subsume on your 4th ability
Basic Build
This build will result in a 175% haste mote if you do your setup correctly.
Run Arcane Bellicose instead of Arcane Power Ramp in the screenshot

Min-Maxed Build
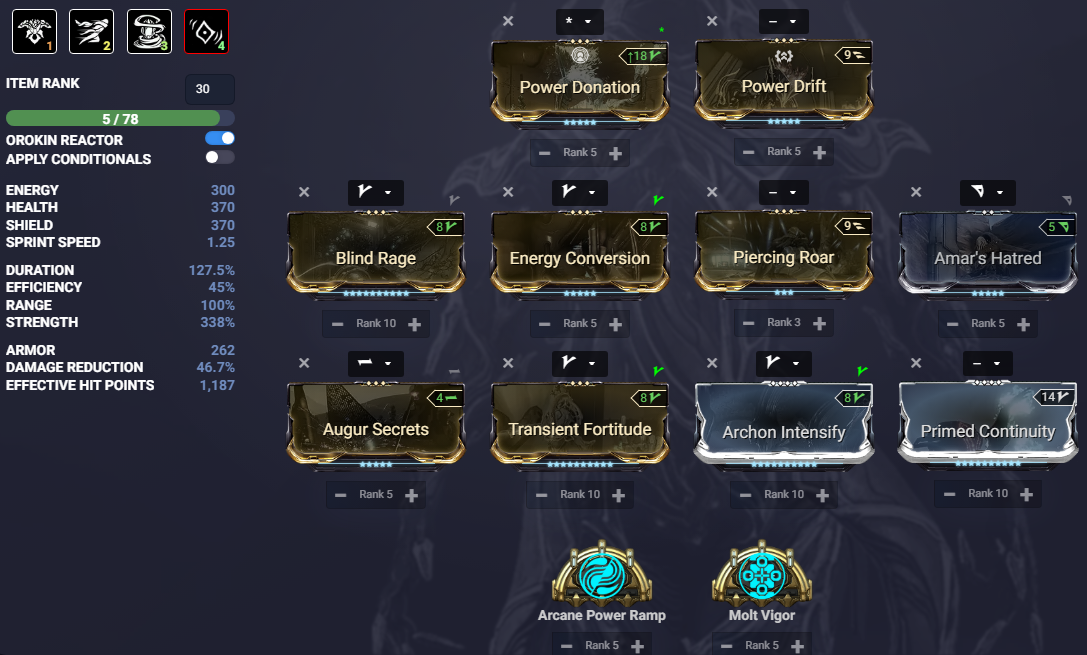
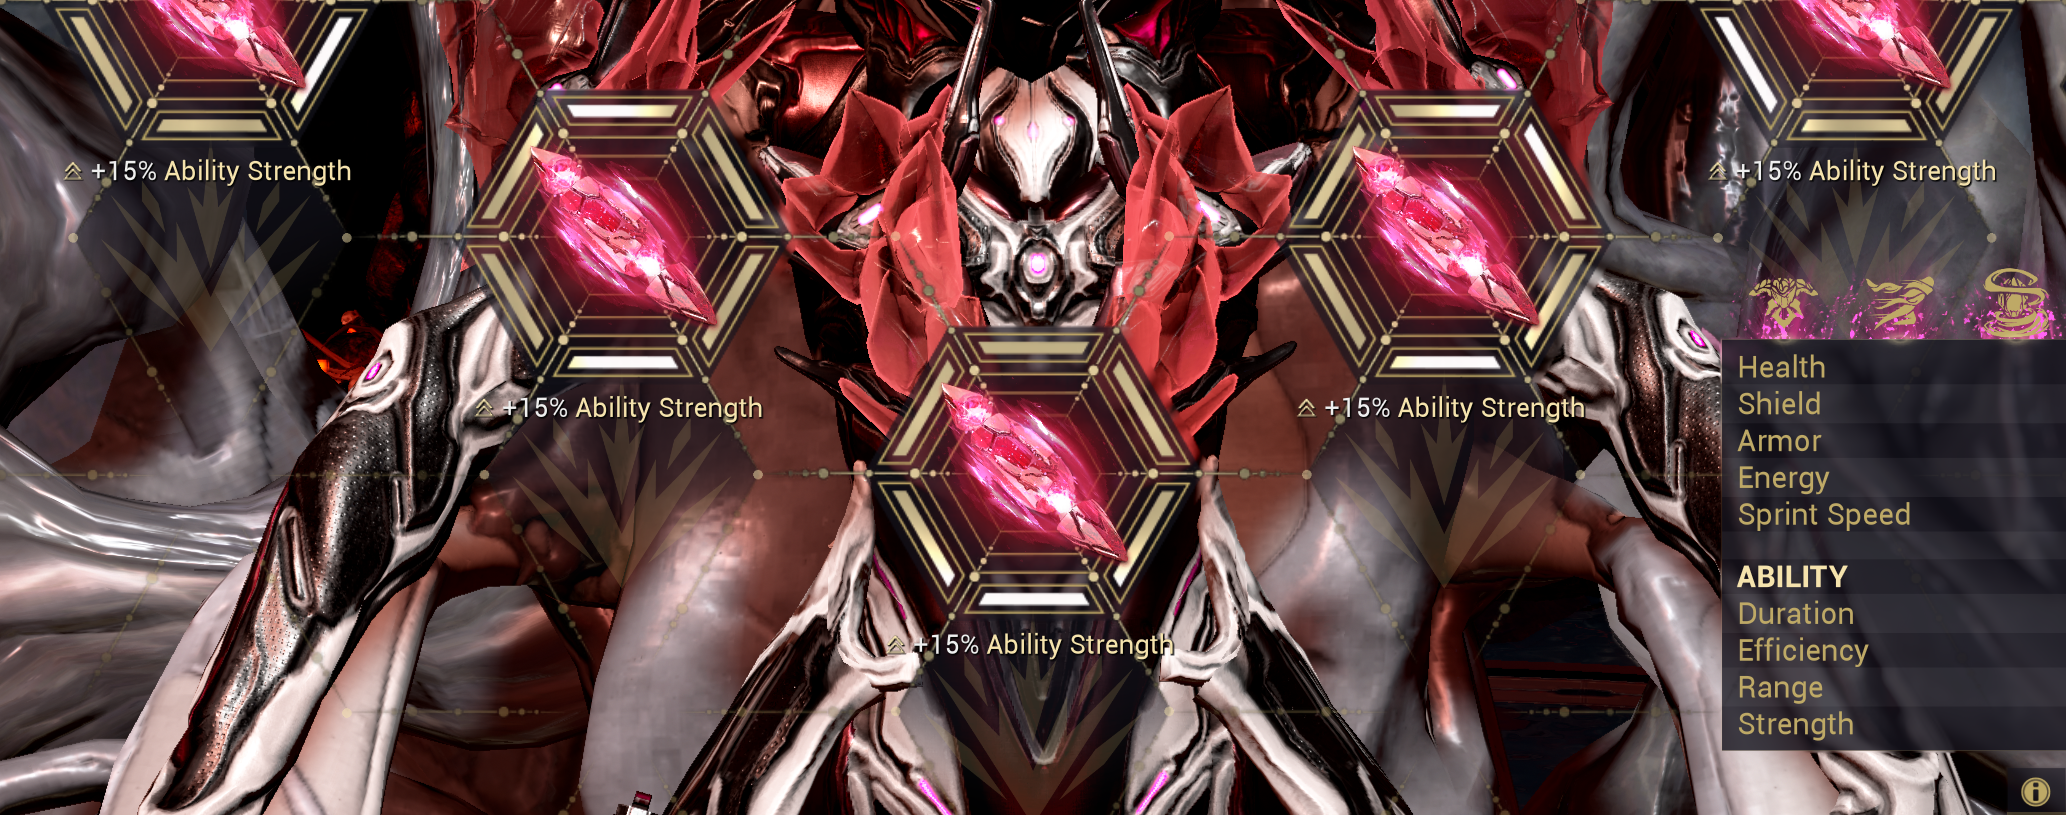
Archon Shards
5x Strength
You can also go for a Tri-Umbra build on Wisp replacing Augur Secrets, Archon Intensify and Amar’s hatred with the 3 Umbral mods.
The Tri-Umbra build has a higher cost due to the availability of Umbra Forma, but you can also just slot Rank 0 Umbral Fiber and Umbral Vitality which are purchasable from Cephalon Simaris.
You will have slightly worse motes with this build but it’s way easier to use.
Advanced Information
Power Donation and Enemy Radar are interchangeable, coordinate with your team as one person running Enemy Radar can really help with shooting at spawns but make sure at least 3 people are running Power Donation
Weapons
Kuva Ogris
For Arbitrations we currently use a Toxin Progenitor to create corrosive damage on Mirage with a single purple shard.
Saryn can use a Cold Progenitor to get viral with the modded toxin but that is not needed at all, since Saryn has more than enought damage already.
A Riven is not required at all and if you have a Riven replace Vigilante Armaments.
Make sure to equip the bane mod since it’s a must have. Non-primed bane is fine too.
Nightwatch Napalm leaves lingering AOE damage zones, these will kill enemies on spawn as long as you’re firing at the spawn points which makes this the best weapon for Arbitrations.
MAKE SURE YOUR OGRIS ENERGY COLOR IS PURE BLACK, or you’ll blind all your teammates with the visual effect
Basic Build for Mirage and Chroma

The Min-Maxed Build for Mirage and Chroma has 1 more shot in the magazine resulting in 4 more shots for Mirage.
Min-Maxed Build for Mirage and Chroma
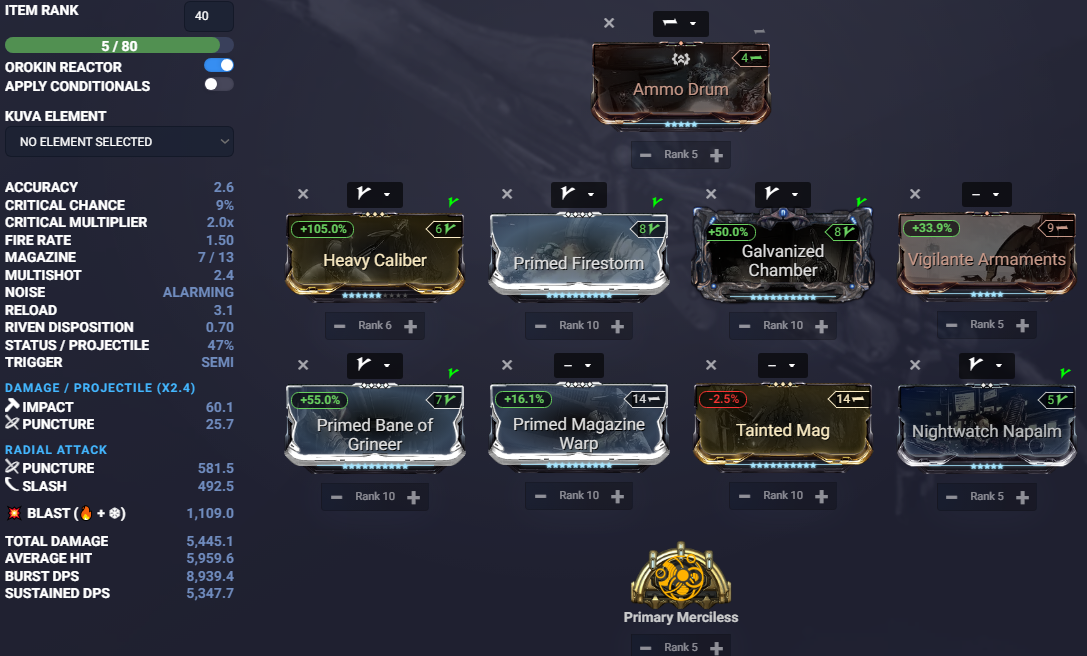
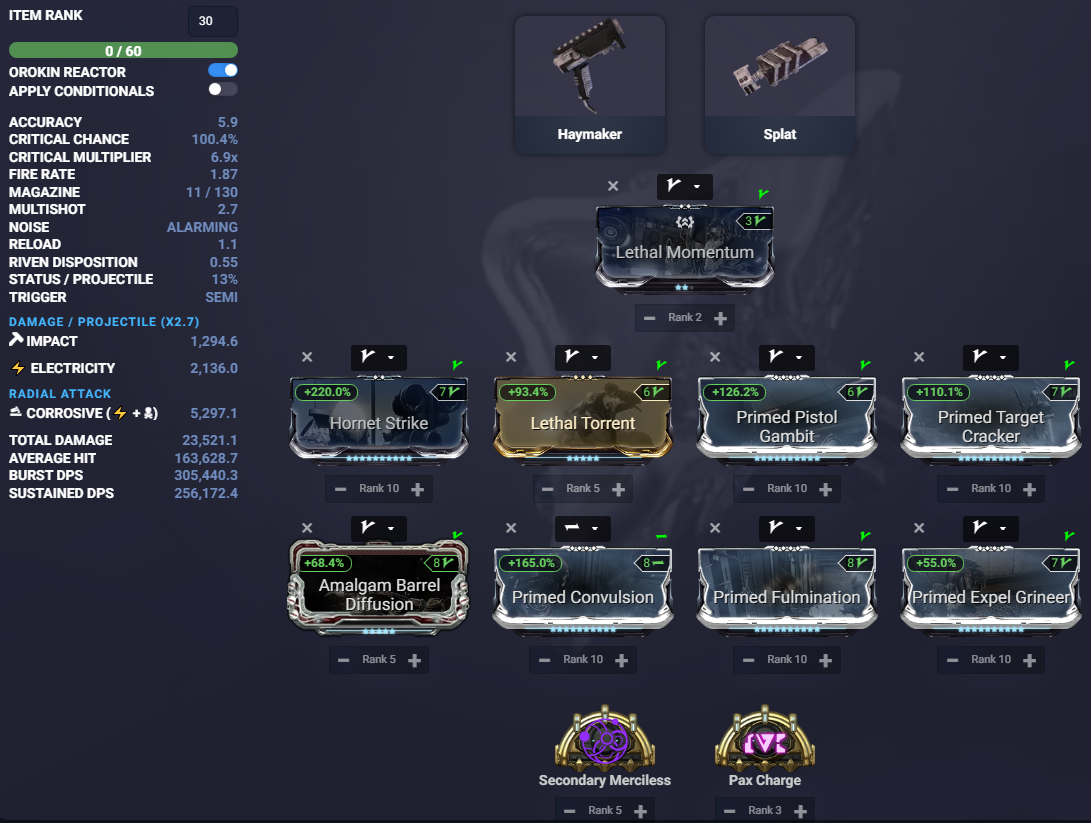
Basic Build for Saryn
The diffrence between the Ogris builds is that Saryn wants to mod for more toxin damage with Infected Clip while Mirage uses the slot to get a better magazine size.
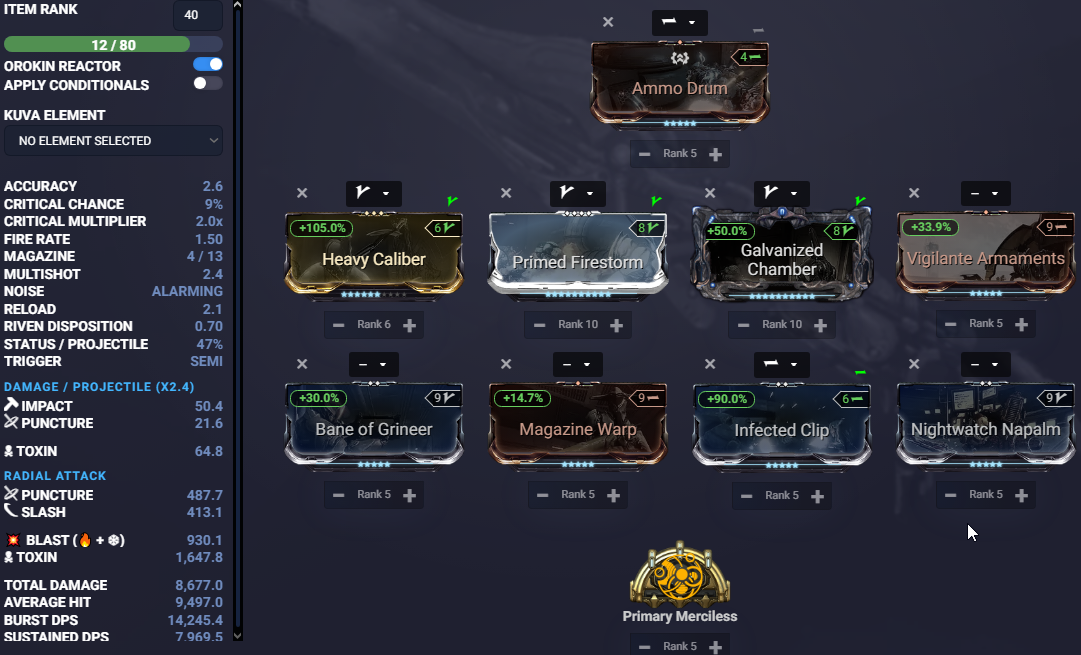
Min-Maxed Build for Saryn

Afentis
Wisp will be running Afentis to boost her team. Drop Afentis where your team camps and refresh the buff when it’s about to run out, you get Afentis from rank 5 Kahl garrison so if you don’t have that, just use the Kuva Ogris and DPS with your team
Chroma sometimes takes an additional Afentis since he won’t be able to kill much in good squads with the Ogris anyways.
Basic Build

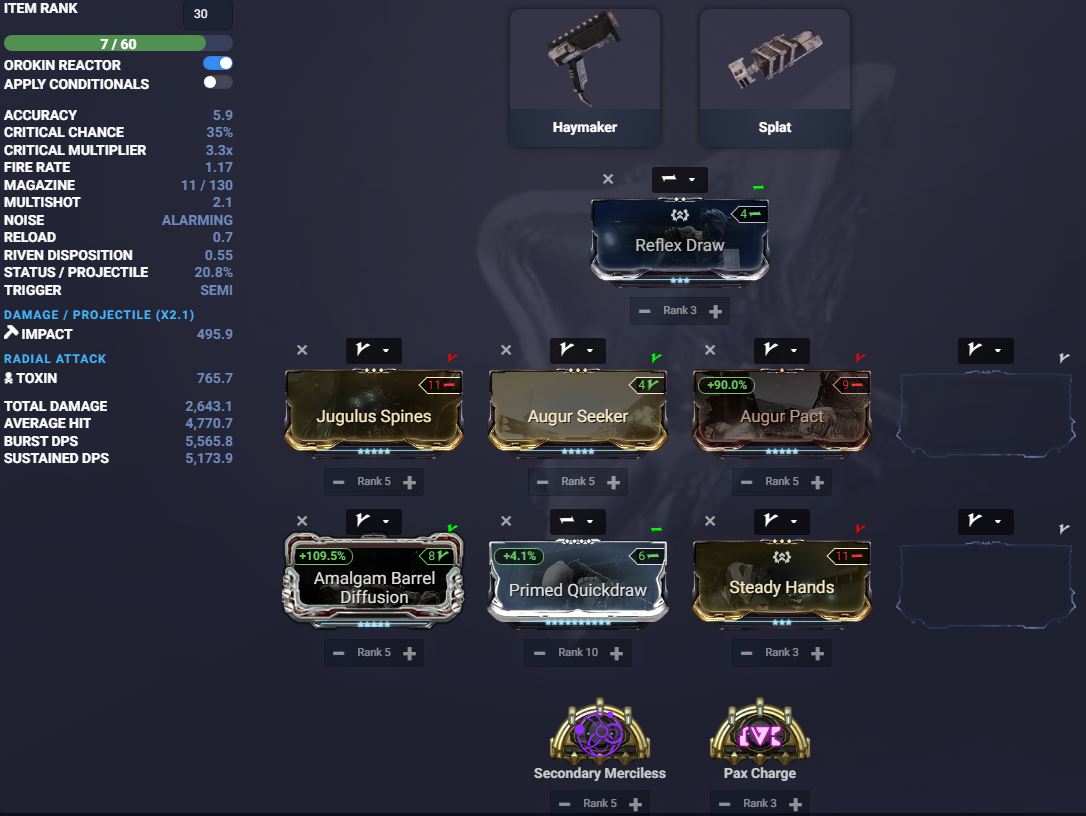
Sporelacer
Sporelacer is good as a secondary it helps you clear out spawns and still help your team with killing enemies if you’re running Afentis as your primary weapon]
Basic Build for Wisp and Chroma
Min-Maxed Build for Wisp and Chroma
Statstick Build for Saryn and Mirage
This build is fully optional but adds some utility through set effects
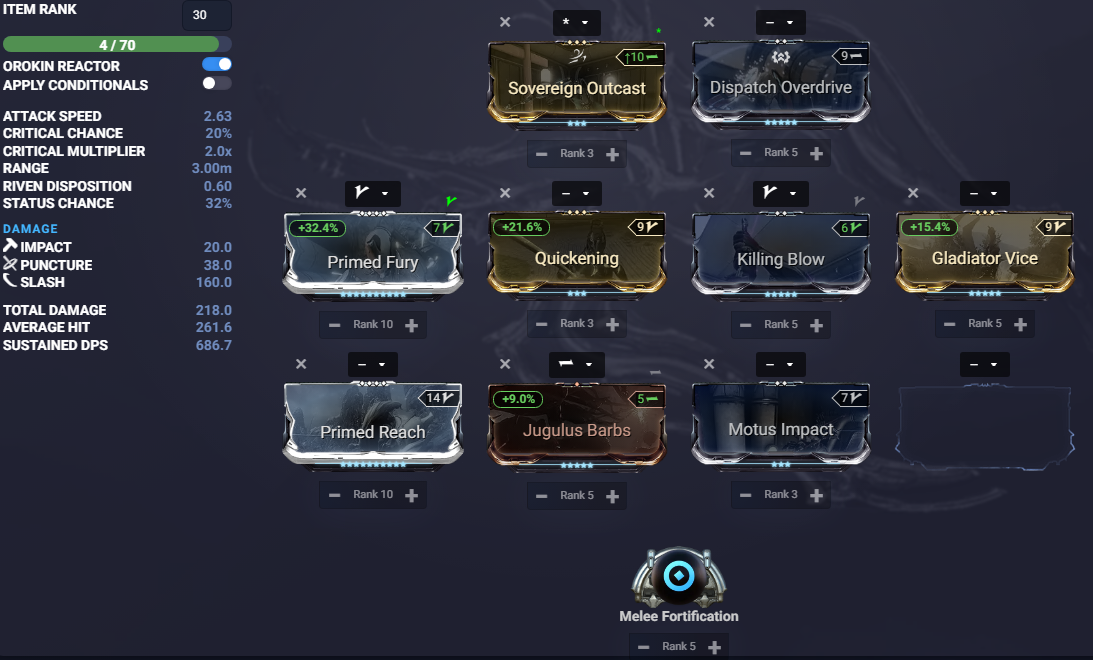
Praedos
The Praedos is a nice addition to the loadout since it provides amazing mobility allowing you to shorten the loot times.
We recommend the following incarnon evolutions
Evolution II: Drifting Grace (Sprint speed and Slide)
Evolution IV: Evolved Ascension (Parkour Velocity)
The other Evolutions are personal perferance.
Statstick Build
This build is fully optional but adds some utily
General Weapon Advice
Secondary Advice
If you have Amalgam Barrel Diffusion, make sure to pop it on whatever secondary you’re running as it gives a good parkour velocity boost when you’re rolling which really helps with looting fast.
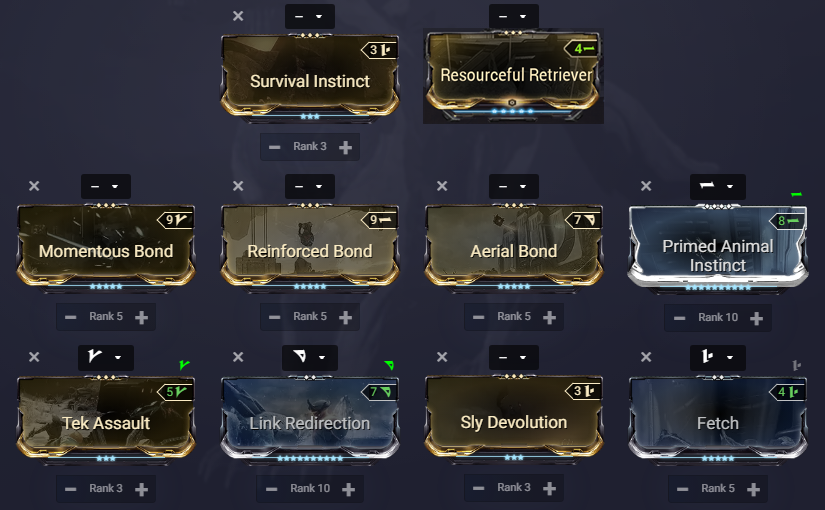
Companions
You can run any beast companion with the Resourceful Retriever mod equiped, but bond mods can give additional utility.
Sly Vulpaphyla
Sadly Martyr Symbiosis doesn’t work in Arbi’s, but the Sly Vulpaphyla also has Survival Instinct which basically gives you a mini Wisp passive boosting your survivability while looting a bit.
Remember to equip bite on your beast companion if you want Tenacious Bond to work.
Companion Build
This build is optional, but it gives some nice additional buffs and helps a bit with survivability.
Gear
Having Energy Restore Pads and Ammo Restore Pads can come in clutch sometimes as well so make sure you’re stocked up on plenty of those. You can get 100x restore blueprints from the different labs in the dojo.
The ability of the Mantis Landing Craft is also nice to have since it summons a Life Support Capsule on which you can stand on. So you can shoot from a more elevated Position.
Specters
The specters used are Ancient Healer Specter and Nidus Specter for Parasitic Link just make sure to make them stationary where you’ll be camping. The quality of the specter also does not matter as a 1 star specter will functionally be the exact same as a 4 star specter so make sure to use whichever ones you have.
Mods do not apply to Specters
For weapons ensure you use Battery Weapons like the Shedu and Cycron on them so that they don’t take ammo away from you. Besides that weapon choice doesn’t really matter as you’ll really just be using them for their abilities.
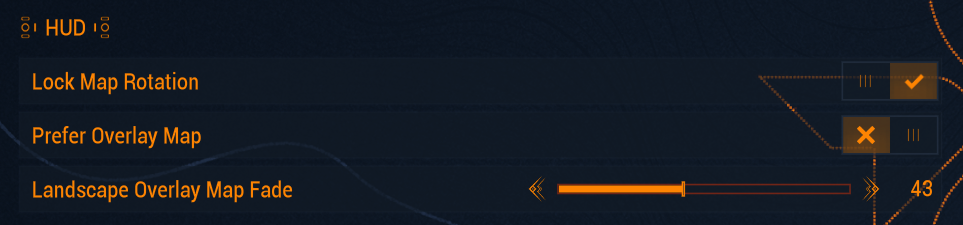
Recommended Warframe Settings
For the map
For whatever frame you’re hating to hold abilities (ex. Vauban)

To save your eyes really

Nodes, Tiles and Mission Types
For your convenience, the best tiles have been sorted into the S-Tier and A-Tier category and you can simply pick up the roles to get pinged for these in the server.
The Tier of a node is simply decided by the possible vitus essence per hour (VE/h).
Survival, disruption and other “Open tile” missions have the issue of way too spread out uncontrollable spawns resulting in drones getting stuck in random locations, resulting in 1 less possible drone for the rest of the mission and way lower KPM (kills per minute).
People usually only play S and A Tier arbitrations, some still play B tier missions but i wouldn’t expect to find lobbies for anything below S/A-Tier.
Mission types
Interception and Defense are the best mission types to farm Vitus essence. Defense is simple enough (camp one point and shoot at spawns) and there is an example video at the bottom of this guide.
For interception you want to make sure the rounds go on for as long as possible so you can do much longer runs as enemies will scale much much more slowly. To achieve this, you’ll want to capture TWO points at the start of the round and neutralize one other point. Once your progress is 2% higher than the enemy you can let the neutralized point get captured back again and proceed to return to the camp point and shoot at spawns until next round. Be careful not to get distracted and let enemies capture any of your points after that though. Make sure to coordinate with your team about who will cap and who will neutralize at the start of runs to make things easier.
Double Dipping (DD)
How to run the same mission twice
Some arbitrations are just better than others. Sometimes the map is better so you can shoot at spawns without there being walls and obstructions which leads to higher kills per minute which leads to getting more Vitus essence and there’s no guarantee that the next Arbitration map will be just as good. This is why DD or Double Dipping is so important as it allows you to play the same map twice.
To achieve this players need to party up and all join a relay together. Once in the relay you’ll have to try and get a resource booster blessing either from a kind stranger or from someone in your party whose mastery rank 30 for more loot.
Everyone will then LEAVE the relay and make a party again. You will then join a relay again and start the arbitration from the navigation area of the relay. Make sure to leave 5-10 minutes before the arbitration ends. Once you’re back in the relay you’ll be able to select the arbitration mission again and do a full long run of it and it’s that simple to double dip. Make sure you don’t leave the relay or join a different relay after finishing your first arbitration run as you’ll lose the ability to play the mission again.
The only map that you can’t double dip well is the frozen world corpus one as you can get a random selection between 3 maps when you load into that and only one of the maps is good.